| •
|
Put on gloves to protect your hands.
|
|
| •
|
When prying with a flat-tip screwdriver, wrap it with
protective tape, and apply protective tape around the related
parts, to prevent damage.
|
| •
|
Take care not to scratch the body surface.
|
|
|
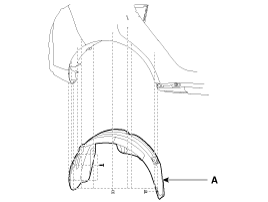
2. |
After loosening the mounting clips and screws, then remove the
rear wheel guard (A).
|
|
3. |
Install in the reverse order of removal.
|
• |
Replace any damaged clips.
|
|
|
•
Put on gloves to protect your hands.
...
•
Put on gloves to protect your hands.
...
See also:
Parking Brake Lever. Removal
The parking brake cables must not be bent or distorted. This will
lead to stiff operation and premature failure.
...
CVVT & Camshaft Description
Continuous Variable Valve Timing (CVVT) system advances or retards the
valve timing of the intake and exhaust valve in accordance with the ECM control
signal which is calculated by the engine ...
Control Shaft Complete Installation
1.
Install in the reverse order of removal.
•
...
 Kia Soul: Rear Wheel Guard Replacement


 Front Wheel Guard Replacement
 Front Mud Guard Replacement