| •
|
Put on gloves to protect your hands.
|
|
| •
|
When prying with a flat-tip screwdriver, wrap it with
protective tape, and apply protective tape around the related
parts, to prevent damage.
|
| •
|
Use a plastic panel removal tool to remove interior trim
pieces to protect from marring the surface.
|
| •
|
Take care not to bend or scratch the trim and panels.
|
|
|
1. |
Remove the rear seat back cover [LH]or [RH].
(Refer to Rear Seat - "Rear Seat Back Cover")
|
|
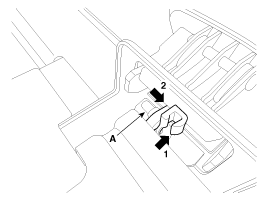
2. |
After loosening the mounting bolts, then remove the rear seat
latch (A).
Tightening torque :
19.6 ~ 29.4 N.m (2.0 ~ 3.0 kgf.m, 14.5 ~ 21.7 lb-ft)
|

|
|
3. |
Remove the rear seat latch rod (A) to direction of the arrow.
|
|
4. |
Install in the reverse order of removal.
|
1. Rear seat latch assembly
...
1. Rear seat folding lever
...
See also:
Fuel Filter. Repair procedures
Removal
1.
Remove the fuel pump.
(Refer to Fuel Delivery System - "Fuel Pump")
...
CVVT & Camshaft Components
1. Exhaust camshaft
2. Intake camshaft
3. Exhaust CVVT
4. Intake CVVT
5. Camshaft bearing cap
6. Camshaft front bearing cap
7. O-ring
8. OCV (Oil Control Valve) a ...
120,000 miles or 96 months
❑ Inspect air conditioning compressor, air conditioner refrigerant and performance
(if equipped)
❑ Inspect cooling system *1
❑ Inspect drive belt *4 (First 60,000 miles or 72 ...
 Kia Soul: Rear Seat Latch Replacement

 Rear Seat Latch Component Location
 Rear Seat Folding Lever Component Location