|
1. |
Disconnect the negative (-) battery terminal.
|
|
2. |
Remove the heater and blower assembly.
(Refer to Heater -"Heater Unit")
|
|
3. |
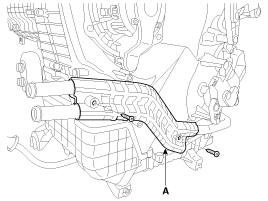
Remove the heater core cover (A) after loosening the mounting
screws.

|
|
4. |
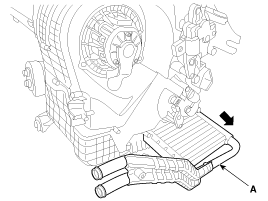
Pull out the heater core (A) from the heater unit.

|
|
5. |
Install in the reverse order of removal.
| A. |
If you're installing a new heater core, add refrigerant
oil (PAG OIL).
|
| B. |
Replace the O-rings with new ones at each fitting, and
apply a thin coat of refrigerant oil before installing them.
Be sure to use the right O-rings for R-134a to avoid leakage.
|
| C. |
Immediately after using the oil, replace the cap on the
container, and seal it to avoid moisture absorption.
|
| D. |
Do not spill the refrigerant oil on the vehicle; it may
damage the paint; if the refrigerant oil contacts the paint,
wash it off immediately.
|
| E. |
Apply sealant to the grommets.
|
| F. |
Make sure that there is no air leakage.
|
| G. |
Charge the system and test its performance.
|
| H. |
Do not interchange the inlet and outlet heater hoses and
install the hose clamps securely.
|
| I. |
Refill the cooling system with engine coolant.
|
|
1.
Disconnect the negative (-) battery terminal.
2.
Recover the refrigerant with a recovery/recycling/charging station.
3.
...
1.
Disconnect the negative (-) battery terminal.
2.
Remove the heater and blower assembly.
(Refer to Heater -"Heater Unit")
...
See also:
Brake fluid Inspection
1.
Check the brake fluid level.
Take care as brake fluid can harm your ha ...
Inner panel fuse replacement
1. Turn the ignition switch and all other switches off.
2. Open the fuse panel cover.
WARNING
Be careful not to hurt your hands when a fuse is replaced due to narrow space.
3. Pull the sus ...
Multimedia Jack Description
The multimedia jack on the console upper cover is for customers who
like to listen to external portable music players like the MP3, iPod and
etc., through the vehicle's sound system wh ...
 Kia Soul: Heater Core Replacement
 Heater Unit Replacement
 Evaporator Core Replacement

