 Kia Soul: ESC Control Module. Removal
Kia Soul 2014-2019 PS Service Manual / Brake System / ESC(Electronic Stability Control) System / ESC Control Module. Removal
| 1. |
Turn ignition switch OFF and disconnect the negative (-) battery
cable.
|
| 2. |
Remove the ECM.
(Refer to Engine Control / Fuel System - ŌĆ£Engine Control Module
(ECM)ŌĆØ)
|
| 3. |
Remove the brake fluid from the master cylinder reservoir with
a syringe.
|
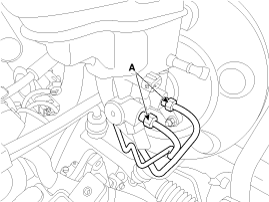
| 4. |
Disconnect the brake tube (A) from the master cylinder by loosening
the tube flare nut.
|
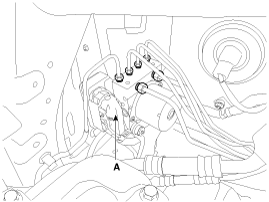
| 5. |
Pull up the lock of the HECU connector and then disconnect the
connector (B) .
|
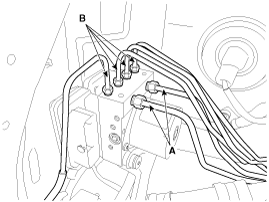
| 6. |
Loosen the flare nuts and then remove the brake tube (A).
|
| 7. |
Disconnect the brake tubes (B) from the HECU by unlocking the
nuts counterclockwise with a spanner.
|
| 8. |
Remove the engine room under cover. [G2.0 NU GDI only]
(Refer to Engine Mechanical System - "Engine Room Under Cover")
|
| 9. |
Install the jack under the edge of lower oil pan to support the
engine. [G2.0 NU GDI only]
|
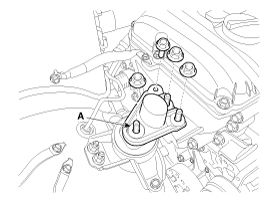
| 10. |
Remove the engine mounting support bracket (A). [G2.0 NU GDI only]
|
| 11. |
Slowly lower the jack. [G2.0 NU GDI only]
|
| 12. |
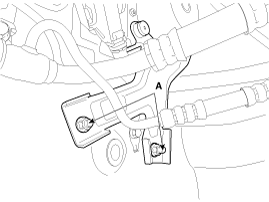
Loosen the HECU bracket nuts (A) and then remove HECU and bracket.
|
| 13. |
Remove the bolts and then remove the bracket from HECU.
|
 ESC Control Module. Components
1. Front - left tube
2. Rear - right tube
3. Rear - left tube
4. Front - right tube
5. MC2
6. MC1
7. ESC control module(HECU)
8. Bracket
...
 ESC Control Module. Installation
1.
Install in the reverse order of removal.
2.
Tighten the HECU mounting bolts and nuts to the specified torque.
3.
...
See also:
Audio system
If you install an aftermarket HID head lamps, your vehicleŌĆÖs audio and electronic
devices may malfunction. ...
Sealant
Items
Specified sealant
Control shaft assembly
LOCTITE 5060 or Anaerobic adhesives type J (For
flange)
...
Fuel lines, hoses and connections Inspection
Visually check the fuel lines for cracks, leakage, loose connections,
deformation or tank band looseness. ...


