 Kia Soul: Cylinder Head Removal
Kia Soul 2014-2019 PS Service Manual / Engine Mechanical System / Cylinder Head Assembly / Cylinder Head Removal
Engine removal is not required for this procedure.
|

Mark all wiring and hoses to avoid misconnection.
|

| 1. |
Remove the engine cover.
|
| 2. |
Disconnect the battery negative terminal.
|
| 3. |
Remove the air duct and air cleaner assembly.
(Refer to Intake and Exhaust System - "Air Cleaner")
|
| 4. |
Disconnect the mounting bracket and then remove the battery.
(Refer to Engine Electrical System - "Battery")
|
| 5. |
Disconnect the ECM connector and then remove the battery tray.
(Refer to Engine Electrical System - "Battery")
|
| 6. |
Remove the engine room under cover.
|
| 7. |
Loosen the drain plug and drain the coolant. Open the radiator
cap to make rapid draining.
(Refer to Cooling System - "Coolant")
|
| 8. |
Remove the radiator upper hose and lower hose.
(Refer to Cooling System - Radiator Hose")
|
| 9. |
Disconnect the compressor connector.
(Refer to Heating, Ventilation Air conditioning -"Compressor")
|
| 10. |
Disconnect the alternator connector and the cable from the alternator
“B” terminal.
(Refer to Engine Electical System - "Alternator")
|
| 11. |
Disconnect the water temprature sensor.
(Refer to Engine Control / Fuel System - "Engine Control System")
|
| 12. |
The ETC (Electronic throttle control) connector and the MAPS (Manifold
absolute pressure sensor) & IATS (Intake air temperature sensor) connector.
(Refer to Engine Control / Fuel System - "ETC System")
|
| 13. |
Disconnect the heater hose(A) and brake booster vacuum hose(B).
|
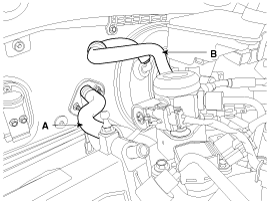
| 14. |
Remove the vacuum pipe assembly(A).
|
| 15. |
Remove the cylinder head cover.
(Refer to Cylinder Head Assembly - "Cylinder Head Cover")
|
| 16. |
Remove the timing chain cover.
(Refet to Timing System - "Timing Chain Cover")
|
| 17. |
Remove the camshaft.
(Refer to Cylinder Head Assembly - "CVVT & Camshaft")
|
| 18. |
Remove the intake manifold.
(Refer to Intake And Exhaust System - "Intake Manifold")
|
| 19. |
Remove the exhaust manifold.
(Refer to Intake And Exhaust System - "Exhaust Manifold")
|
| 20. |
Remove the delivery pipe assembly.
(Refer to Engine Control / Fuel System - "Delivery Pipe")
|
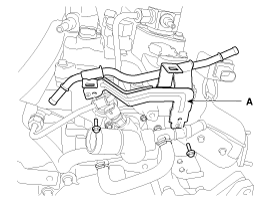
| 21. |
Disconnect the bypass hose, and then remove the water temperature
control assembly.
(Refer to Cooling System - "Water Temperature Control Assembly")
|
| 22. |
Remove the heater pipe.
(Refet to Cooling System - "Water Pipe")
|
| 23. |
Remove the intake OCV(Oil Control Valve).
(Refer to Engine Control / Fuel System - "CVVT Oil Control Valve")
|
| 24. |
Remove the cylinder head bolts, then remove the cylinder head.
|
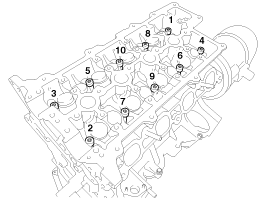
 Cylinder Head Components
1. Cylinder head assembly
2. MLA
3. Retainer lock
4. Retainer
5. Valve stem seal
6. Valve spring
7. Valve spring seat
8. OCV (Oil Control Valve)
9. Exhaust valv ...
 Cylinder Head Disassembly
Identify MLA(Mechanical lash adjuster), valves, valve springs
as they are removed so that each item can be reinstalled i ...
See also:
Side Airbag (SAB) Module. Installation
Be sure to install the harness wires not to be pinched or interfered
with other parts.
...
Temperature Control Actuator
The heater unit includes mode control actuator and temperature control
actuator.
The temperature control actuator is located at the heater unit. It regulates
the temperature by the proced ...
Brake Booster. Inspection
1.
Inspect the check valve in the vacuum hose.
Do not remove the check va ...