[Center pillar lower trim]
| •
|
Put on gloves to protect your hands.
|
|
| •
|
When prying with a flat-tip screwdriver, wrap it with
protective tape, and apply protective tape around the related
parts, to prevent damage.
|
| •
|
Use a plastic panel removal tool to remove interior trim
pieces to protect from marring the surface.
|
| •
|
Take care not to bend or scratch the trim and panels.
|
|
|
1. |
Remove the front door scuff trim.
(Refer to Interior Trim - "Door Scuff Trim")
|
|
2. |
Remove the rear door scuff trim.
(Refer to Interior Trim - "Door Scuff Trim")
|
|
3. |
Slighty remove the front door body side weatherstrip.
|
|
4. |
Slighty remove the rear door body side weatherstrip.
|
|
5. |
Remove the center pillar lower trim.
|
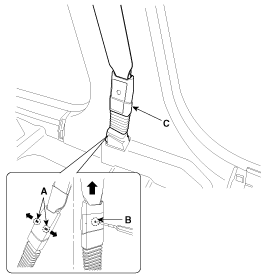
(1) |
To remove the seat belt anchor pretensioner (C), keep
on pushing the lock pin (A) as arrow direction. And then remove
the seat belt after pushing the lock pin (B).
|
|
(2) |
Using a screwdriver or remover, remove the center pillar
lower trim (A).
|
|
|
6. |
Install in the reverse order of removal.
|
• |
Replace any damaged clips.
|
|
|
[Center pillar upper trim]
| •
|
Put on gloves to protect your hands.
|
|
| •
|
When prying with a flat-tip screwdriver, wrap it with
protective tape, and apply protective tape around the related
parts, to prevent damage.
|
| •
|
Use a plastic panel removal tool to remove interior trim
pieces to protect from marring the surface.
|
| •
|
Take care not to bend or scratch the trim and panels.
|
|
|
1. |
Remove the center pillar lower trim.
|
|
2. |
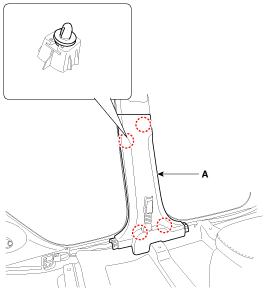
After loosening the mounting bolt, then remove the center pillar
upper trim (A).

|
|
3. |
Install in the reverse order of removal.
|
• |
Replace any damaged clips.
|
|
|
1. Center pillar lower trim
2. Center pillar upper trim
...
1. Rear transverse trim
...
See also:
Rocking the vehicle
If it is necessary to rock the vehicle to free it from snow, sand, or mud, first
turn the steering wheel right and left to clear the area around your front wheels.
Then, shift back and forth betwe ...
Warning Lamp Activation
Warning Lamp Behavior after Ignition
On
As soon as the operating voltage is applied to the SRSCM ignition input,
the SRSCM activates the warning lamp for a LED lamp check.
T ...
Manifold Absolute Pressure Sensor (MAPS). Repair procedures
Inspection
1.
Connect the GDS on the Data Link Connector (DLC).
2.
Measure the output voltage of the MAPS at idle and IG ON.
...
 Kia Soul: Center Pillar Trim Replacement


 Center Pillar Trim Component Location
 Rear Transverse Trim Component Location