Inspection
|
1. |
Check the signal waveform of the CMPS and CKPS using the GDS.
Specification:
Refer to ŌĆ£Wave FormŌĆØ
|
|
Removal
| ŌĆó
|
DONŌĆÖT remove the camshaft position sensor while the engine
is running or right after engine is turned off. The part and
engine oil is hot and can cause burns.
|
|
|
1. |
Turn the ignition switch OFF and disconnect the battery negative
(-) cable.
|
|
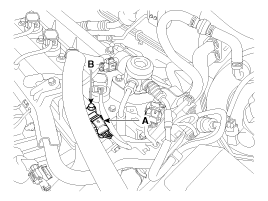
2. |
Disconnect the camshaft position sensor connector (A).
|
|
3. |
Remove the mounting bolt (B), and then remove the sensor.
|
|
1. |
Turn the ignition switch OFF and disconnect the battery negative
(-) cable.
|
|
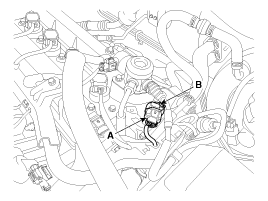
2. |
Disconnect the camshaft position sensor connector (A).
|
|
3. |
Remove the mounting bolt (B), and then remove the sensor.
|
Installation
| ŌĆó
|
Install the component with the specified torques.
|
| ŌĆó
|
Note that internal damage may occur when the component
is dropped. If the component has been dropped, inspect before
installing.
|
|
| ŌĆó
|
Apply the engine oil to the O-ring.
|
|
| ŌĆó
|
Insert the sensor in the installation hole and be careful
not to damage.
|
|
| ŌĆó
|
Be careful not to damage the sensor housing and the connector.
|
| ŌĆó
|
Be careful not to damage the O-ring.
|
|
|
1. |
Install in the reverse order of removal.
Camshaft position sensor mounting
bolt:
7.8 ~ 11.8 N.m (0.8 ~ 1.2 kgf.m, 5.8 ~ 8.7 lb-ft)
|
|
Circuit Diagram
(M/T)
(A/T)
...
Description
Knocking is a phenomenon characterized by undesirable vibration and noise
and can cause engine damage. Knock Sensor (KS) is installed on the cylinder
block and senses engine knoc ...
See also:
Component Replacement after Deployment
Before doing any SRS repairs, use the GDS to check for DTCs. Refer
to the Diagnostic Trouble Code list for repairing of ...
Driving at night
Because night driving presents more hazards than driving in the daylight, here
are some important tips to remember:
Slow down and keep more distance between you and other vehicles, as it may ...
Owner maintenance schedule
When you stop for fuel:
Check the engine oil level.
Check the coolant level in the coolant reservoir.
Check the windshield washer fluid level.
Look for low or under-inflated tires. Check if ...
 Kia Soul: Camshaft Position Sensor (CMPS). Repair procedures

 Camshaft Position Sensor (CMPS). Schematic Diagrams
 Knock Sensor (KS). Description and Operation