| âĒ
|
In order to remove the panorama sunroof assembly, use
the tools shown in the following figure:
[Tooling Diagram]
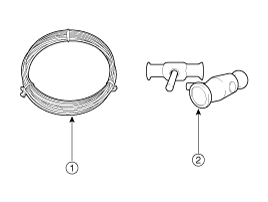
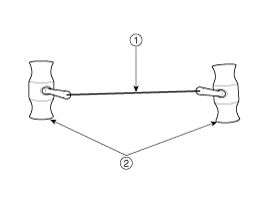
 Square wire Square wire
 Insert-type wire grip Insert-type wire grip
[Tooling Assembly Diagram]
|
|
|
1. |
Remove the roof side moulding.
(Refer to Body Side Moulding - "Roof Side Moulding")
|
|
2. |
Remove the front glass.
(Refer to Panorama Sunroof - "Front Glass")
|
|
3. |
Remove the roof trim.
(Refer to Roof Trim - "Roof Trim Assembly")
|
|
4. |
Remove the curtain airbag (CAB) module.
(Refer to Restraint - "Curtain Airbag (CAB) Module")
|
|
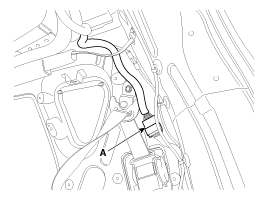
5. |
Remove the panorama sunroof motor connector (A) by pressing the
lock pin.
|
|
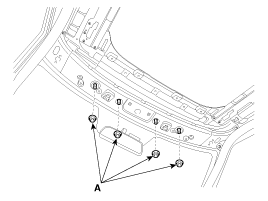
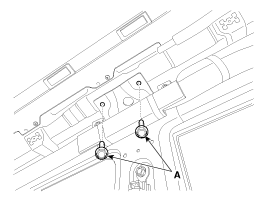
6. |
Loosen the panorama sunroof mounting nuts (A).
[Front]
Tightening torque :
9.8 ~ 14.7 N.m (1.0 ~ 1.5 kgf.m, 7.2 ~ 10.8 lb-ft)
|
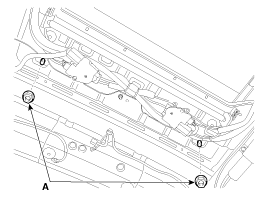
[Rear]
Tightening torque :
9.8 ~ 14.7 N.m (1.0 ~ 1.5 kgf.m, 7.2 ~ 10.8 lb-ft)
|
|
|
7. |
Loosen the bolts (A) on the side of the panorama sunroof.
Tightening torque :
19.6 ~ 29.4 N.m (2.0 ~ 3.0 kgf.m, 14.5 ~ 21.7 lb-ft)
|
|
|
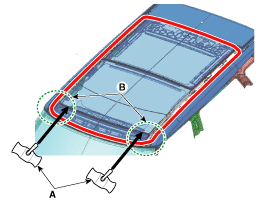
8. |
Pull the square wire (A) to the left and right, then apply a force
in the direction of the arrow to cut off the residual sealant on front
edge (B).
|
âĒ |
Make sure that you put on gloves to protect your
hands from potential injury.
|
|
âĒ |
Be careful about potentially burning your hands
due to the heat generated from the wire in use.
|
|
âĒ |
Be careful when working with wiring because it
may be cut.
|
|
|
âĒ |
Be careful not to damage the body.
|
|
|
âĒ |
Make sure that two or more people work together
when using wires.
|
|
|
|
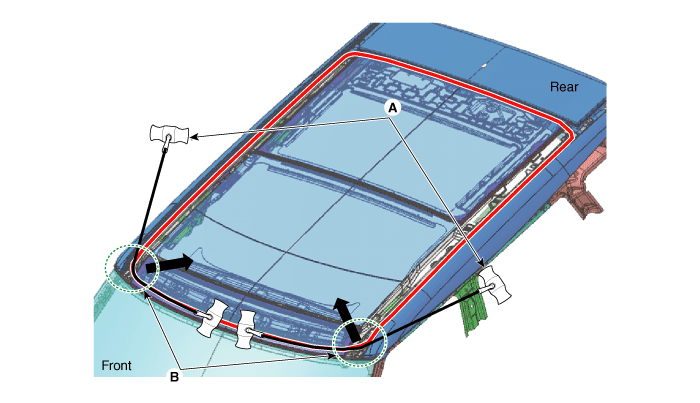
9. |
Push wire (A) from the outside of the body toward the face of
edge (B) in the direction of the arrow.
|
|
10. |
When wire lead is visible inside body, pull wire lead (A) toward
inside.

|
|
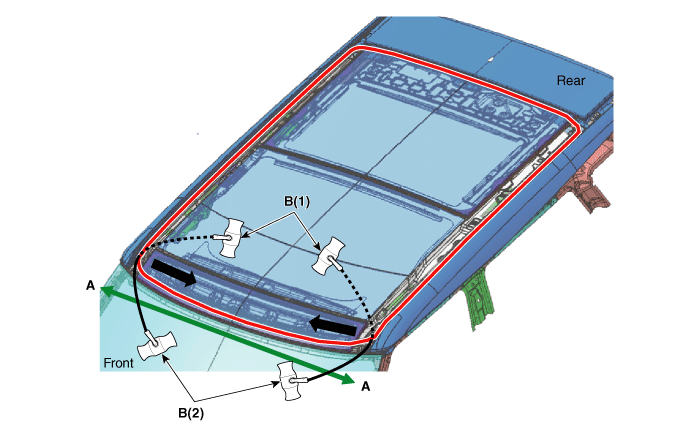
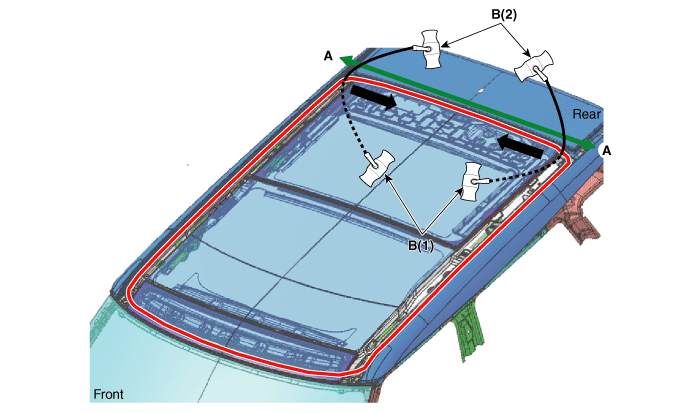
11. |
Pull the square wire (B) to the left and right, then apply a force
in the direction of the arrow to cut off the residual sealant on front
section (A-A).
| B. |
B(2): Work outside car
|
|
âĒ |
Make sure that you put on gloves to protect your
hands from potential injury.
|
|
âĒ |
Be careful about potentially burning your hands
due to the heat generated from the wire in use.
|
|
âĒ |
Be careful when working with wiring because it
may be cut.
|
|
|
âĒ |
Be careful not to damage the body.
|
|
|
âĒ |
Make sure that two or more people work together
when using wires.
|
|
|
âĒ |
When using wires to remove the residual sealant,
there may be an interference between the nut hole and
device hole. Thus, perform sealant removal work as shown
in the following figure:
Use a scraper or flathead
driver to lift up a region between the body and panorama
sunroof.
Turn and pull out wire
(A) between the nut hole and device hole (B) in the
direction of the arrow. Next, cut off the residual sealant
again.
|
|
|
âĒ |
Be careful to avoid damaging the nut hole (C).
|
|
âĒ |
Be careful to avoid damaging the device hole (D).
|
|

|
|
12. |
Pull the square wire (B) to the left and right, then apply a force
in the direction of the arrow to cut off the residual sealant on side
section (A-A).
| B. |
B(2): Work outside car
|
|
âĒ |
Make sure that you put on gloves to protect your
hands from potential injury.
|
|
âĒ |
Be careful about potentially burning your hands
due to the heat generated from the wire in use.
|
|
âĒ |
Be careful when working with wiring because it
may be cut.
|
|
|
âĒ |
Be careful not to damage the body.
|
|
|
âĒ |
Make sure that two or more people work together
when using wires.
|
|

|
|
13. |
Pull the square wire (B) to the left and right, then apply a force
in the direction of the arrow to cut off the residual sealant on rear
section (A-A).
| B. |
B(2): Work outside car
|
|
âĒ |
Make sure that you put on gloves to protect your
hands from potential injury.
|
|
âĒ |
Be careful about potentially burning your hands
due to the heat generated from the wire in use.
|
|
âĒ |
Be careful when working with wiring because it
may be cut.
|
|
|
âĒ |
Be careful not to damage the body.
|
|
|
âĒ |
Make sure that two or more people work together
when using wires.
|
|
|
âĒ |
When using wires to remove the residual sealant,
there may be an interference between the nut hole and
device hole. Thus, perform sealant removal work as shown
in the following figure:
Use a scraper or flathead
driver to lift up a region between the body and panorama
sunroof.
Turn and pull out wire
(A) between the nut hole and device hole (B) in the
direction of the arrow. Next, cut off the residual sealant
again.
|
|
|
âĒ |
Be careful to avoid damaging the nut hole (C).
|
|
âĒ |
Be careful to avoid damaging the device hole (D).
|
|

|
|
14. |
Cut residual sealant on every surface, and then remove panorama
sunroof assembly (A).
|
âĒ |
Be careful to avoid damaging the panorama sunroof
assembly when removing it.
|
|

|
1.
Install the roller blind side bracket (A) fit into the guide groove
(B).
2.
Tighten the mounting screws after installing the ro ...
âĒ
In order to mount the panorama sunroof assembly, use the
tools shown in the followin ...
See also:
Record your key number
The key code number is stamped on the key code tag attached to the key set. Should
you lose your keys, this number will enable an authorized Kia dealer to duplicate
the keys easily. Remove the ...
Canister Installation
1.
Install in the reverse order of removal.
Canister mounting bolt:
3.9 ~ 5.9 N.m (0.4 ~ 0.6 kgf.m, 2.9 ~ 4.3 lb-ft)
...
Smart Key Unit Circuit Diagram
...
 Kia Soul: Panorama Sunroof Assembly Removal


 Roller Blind Installation
 Panorama Sunroof Assembly Installation