 Kia Soul: Front Driveshaft Replacement
Kia Soul 2014-2019 PS Service Manual / Driveshaft and axle / Driveshaft Assembly / Front Driveshaft Replacement
| 1. |
Loosen the wheel nuts slightly.
Raise the vehicle, and make sure it is securely supported.
|
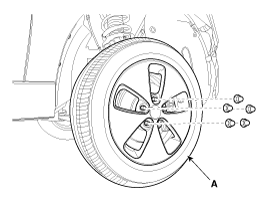
| 2. |
Remove the front wheel and tire (A) from front hub.
|

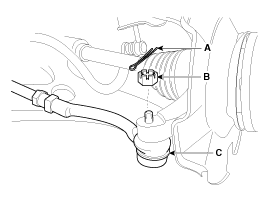
| 3. |
Remove the driveshaft coking nut (A).
|


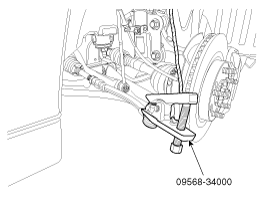
| 4. |
Remove the tie rod end ball joint (C) from the knuckle by using
the SST (09568-34000).
|
| 5. |
Remove the lower arm (A) from the knuckle.
|

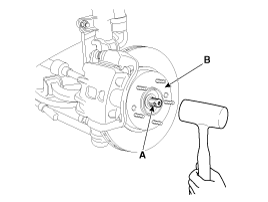
| 6. |
Using a plastic hammer, disconnect driveshaft (A) from the axle
hub (B).
|
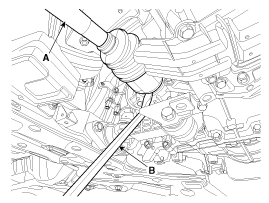
| 7. |
Insert a pry bar (A) between the transaxle case and joint case,
and separate the drive shaft (B) from the transaxle case.
|
| 8. |
Install in the reverse order of removal.
|
| 9. |
Check the front alignment.
(Refer to Suspension System - "Front Alignment")
|
 Front Driveshaft Component
1. Driveshaft (LH)
2. Circlip
3. Driveshaft (RH)
...
 TJ Joint Components
[LH]
1. BJ assembly
2. BJ circlip
3. BJ boot band
4. BJ boot
5. Shaft
6. TJ boot band
7. TJ boot
8. Spider assembly
9. Snap ring
10. TJ h ...
See also:
Vehicle data collection and event data recorders
This vehicle is equipped with an event data recorder (EDR). The main purpose
of an EDR is to record, in certain crash or near crash-like situations, such as
an air bag deployment or hitting a road ...
Start/Stop Button Removal
1.
Disconnect the negative (-) battery terminal.
2.
Detach the gear boots (A).
3.
...
Checking the coolant level
Check the condition and connections of all cooling system hoses and heater hoses.
Replace any swollen or deteriorated hoses.
The coolant level should be filled between F and L marks on the side o ...