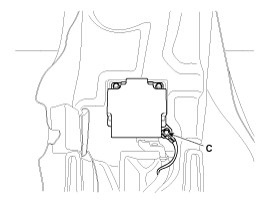
|
1. |
Remove the ignition key from the vehicle.
|
|
2. |
Disconnect the battery negative cable and wait for at least three
minutes before beginning work.
|
|
3. |
Install the SRSCM with the SRSCM mounting bolts.
Tightening torque (SRSCM Mounting
Bolt) :
7.8 ~ 9.8 N.m (0.8 ~ 1.0 kgf.m, 5.7 ~ 7.3 lb-ft)
|

|
• |
Use new mounting bolts when replacing the SRSCM
after a collision.
|
|
• |
When installing the airbag wiring harness, ground
points(C) must be installed.
|
|
|
|
4. |
Connect the SRSCM harness connector.
|
|
5. |
Install the rear heating joint duct.
|
|
6. |
Install the floor console.
(Refer to Body - "Floor console")
|
|
7. |
Reconnect the battery negative cable.
|
|
8. |
After installing the SRSCM, confirm proper system operation:
| A. |
Turn the ignition switch ON; the SRS indicator light should
be turned on for about six seconds and then go off.
|
|
| •
|
SRSCM is sensing the vehicle rollover. SAB, CAB, BPT will
be able to expanse if mechanic moves the SRSCM on vehicle during
IGN ON state. For this reason, turn the IGN OFF surely and then
remove the SRSCM from vehicle.
|
| •
|
If the SRSCM is replaced always perform variant coding.
Also, perform the lateral G sensor calibration.
(Refer to Restraint - "SRS Control Module")
|
|
1.
Remove the ignition key from the vehicle.
2.
Disconnect the battery negative cable and wait for at least three
minutes before beginning ...
1.
Ignition "OFF", connect GDS.
2.
Ignition "ON" & Engine "OFF" select vehicle name and ESC system.
...
 Kia Soul: Yaw-rate and G Sensor. Installation
 Yaw-rate and G Sensor. Removal
 G-Sensor Calibration


