|
1. |
Install the timing chain cover.
|
(1) |
Before installing, remove the hardened sealant from the
cylinder block and ladder frame surface.
|
|
(2) |
Apply the liquid gasket(TB 1217H or LOCTITE 5900H) on
the surface between the cylinder head and the cylinder block.
Width :
3 ~ 5mm (0.1181~0.1969in.)
|
|
|
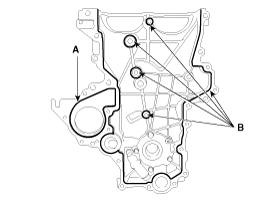
(3) |
Apply the liquid gasket, THREE BOND 1282B or THREE BOND
1216E on the water pump contact parts (A) of the timing chain
cover and THREE BOND 1217H or LOCTITE 5900H on the rest parts
(B).
Reassemble the cover within 5 minutes.
Width :
3.5 ~ 4.5 mm (0.1378 ~ 0.1772 in)
|
|
Remove oil or dust on the surface surely.
|
|
|
(4) |
Align the dowel pin of the cylinder block and the holes
of the oil pump.
|
|
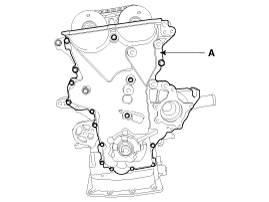
(5) |
Tighten the bolts to install the timing chain cover (A).
Tightening torque
M8 bolts :
18.6 ~ 23.5 N.m (1.9 ~ 2.4 kgf.m, 13.7 ~ 17.4
lb-ft)
M6 bolts :
9.8 ~ 11.8 Nm (1.0 ~ 1.2 kgf.m, 7.2 ~ 8.7 lb-ft)
|
|
|
|
2. |
Install in the reverse order of removal.
|
•
Use fender covers to avoid damaging painted surfaces.
â ...
1. Timing chain
2. Timing chain guide
3. Timing chain arm
4. Timing chain auto tensioner
...
See also:
Ending voice recognition
While Voice Recognition is operating Press and hold the key on the steering remote controller
While using voice command, pressing any steering wheel control or a different key will end vo ...
Manual transaxle operation
The manual transaxle has 6 forward gears.
This shift pattern is imprinted on the shift knob. The transaxle is fully synchronized
in all forward gears so shifting to either a higher or a lower gea ...
Adjustment
Transaxle Control Module (TCM) Learning
When shift shock is occurred or parts related with the transaxle are replaced,
TCM learning should be performed.
In the following cas ...
 Kia Soul: Timing Chain Cover Installation
 Timing Chain Cover Removal
 Timing Chain Components