| •
|
Put on gloves to protect your hands.
|
|
| •
|
When prying with a flat-tip screwdriver, wrap it with
protective tape, and apply protective tape around the related
parts, to prevent damage.
|
| •
|
Use a plastic panel removal tool to remove interior trim
pieces to protect from marring the surface.
|
| •
|
Take care not to bend or scratch the trim and panels.
|
|
|
1. |
Remove the floor console assembly.
(Refer to Floor Console - "Floor Console Assembly")
|
|
2. |
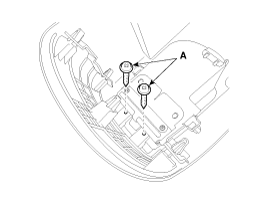
Loosen the rear console cover mounting screws (A).

|
|
3. |
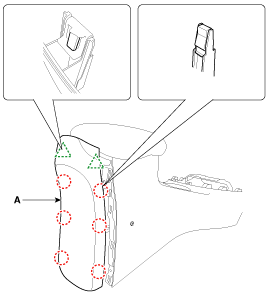
Using a screwdriver or remover, remove the rear console cover
(A).

|
|
4. |
Install in the reverse order of removal.
|
• |
Make sure the connector is connected properly.
|
|
• |
Replace any damaged clips.
|
|
|
1. Rear console cover
...
See also:
Air bag warning label
Air bag warning labels, some required by the U.S. National Highway Traffic Safety
Administration (NHTSA), are attached to the sunvisor to alert the driver and passengers
of potential risks of ...
Engine coolant
The high-pressure cooling system has a reservoir filled with year round antifreeze
coolant. The reservoir is filled at the factory.
Check the antifreeze protection and coolant level at least once a ...
Smart Key Unit Inspection
Smart Key Unit
-
Refer to Smart key System - "Smart key Diagnostic"
Smart Key Switch
-
Refer to Smart ke ...
 Kia Soul: Rear Console Cover Replacement
 Rear Console Cover Component Location
 Console Armrest Component Location


