| •
|
Put on gloves to protect your hands.
|
|
| •
|
When prying with a flat-tip screwdriver, wrap it with
protective tape, and apply protective tape around the related
parts, to prevent damage.
|
| •
|
Use a plastic panel removal tool to remove interior trim
pieces to protect from marring the surface.
|
| •
|
Take care not to bend or scratch the trim and panels.
|
|
|
1. |
Remove the rear bumper cover.
(Refer to Rear Bumper - "Rear Bumper Cover")
|
|
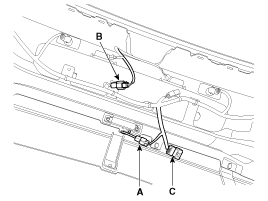
2. |
Disconnect the bumper antenna connector (A) and license lamp connector
(B).
|
|
3. |
Remove the joint connector mounting clip (C).
|
|
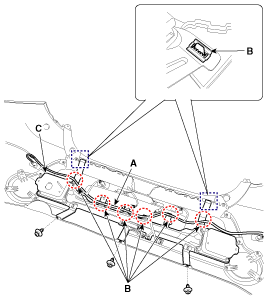
4. |
Remove the rear bumper wiring harness mounting clips (A).
|
|
5. |
Remove the mounting clips (B), then remove the rear bumper beam
assembly (C) and then loosen the clips.
|
|
6. |
Install in the reverse order of removal.
|
• |
Make sure the connector is plugged in properly.
|
|
• |
Replace any damaged clips.
|
|
|
1. Rear bumper beam assembly
...
See also:
Battery Adjustment
Battery Charging
In general, vehicle battery charging system has three forms.
1.
Constant current charge: The battery voltage gradually rises by
charging with setti ...
Flex Steer. Instruction
Flex Steer is system to choose the three modes power steering depending
on driver preference or driving conditions.
...
Components
1. Timing chain
2. Timing chain guide
3. Timing chain arm
4. Timing chain auto tensioner
5. Timing chain cover
6. Drive belt idler
7. ...
 Kia Soul: Rear Bumper Beam Assembly Replacement


 Rear Bumper Beam Assembly Component Location
 Rear Door