 Kia Soul: Front Strut Assembly Replacement
Kia Soul 2014-2019 PS Service Manual / Suspension System / Front Suspension System / Front Strut Assembly Replacement
| 1. |
Loosen the wheel nuts slightly.
Raise the vehicle, and make sure it is securely supported.
|
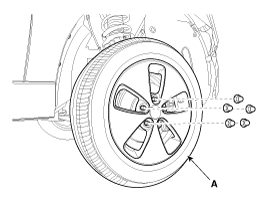
| 2. |
Remove the front wheel and tire (A) from front hub.
|
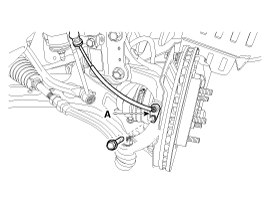
| 3. |
Loosen the bolts (A, B), and then remove the wheel speed sensor.
|
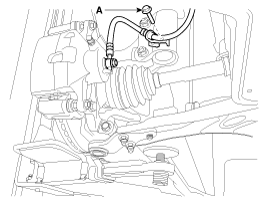
| 4. |
Loosen the brake hose bracket bolts (A).
|
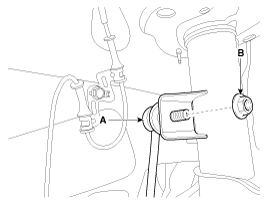
| 5. |
Disconnect the stabilizer link (A) from the front strut assembly
after loosening the nut (B).
|
| 6. |
Remove the cowl top cover.
(Refer to Body - "Cowl Top Cover")
|
| 7. |
Disconnect the front strut assembly (A) from the knuckle by loosening
the bolt & nut.
|
| 8. |
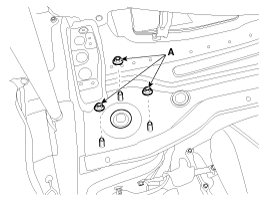
Remove the front strut assembly and then loosen the strut mounting
nuts (A).
|
| 9. |
Installation is the reverse of removal.
|
 Front Strut Assembly Components
1. Strut assembly
2. Insulator
3. Strut bearing
4. Spring upper pad
5. Coil spring
6. Dust cover
7. Bumper rubber
8. Spring lower pad
...
 Front Strut Assembly Disassembly
1.
Using the special tool (09546-26000), compress the coil spring
(A).
Tightening torque:
58.8 ~ 68.6N.m(6.0 ~ 7.0kgf.m, 43.4 ~ 50.6l ...
See also:
Trip computer
The trip computer is a microcomputer- controlled driver information system that
displays information related to driving on the display when the ignition switch
is in the ON position. All stored ...
Hill-start assist control (HAC)
A vehicle has the tendency to roll back on a steep hill when it starts to go
after stopping. The Hill-start Assist Control (HAC) prevents the vehicle from rolling
back by applying the brakes autom ...
Electrical troubleshooting manual:
This manual complements the Service Manual by providing indepth troubleshooting
information for each electrical circuit in your vehicle. ...

