| •
|
Put on gloves to protect your hands.
|
|
| •
|
When prying with a flat-tip screwdriver, wrap it with
protective tape, and apply protective tape around the related
parts, to prevent damage.
|
| •
|
Use a plastic panel removal tool to remove interior trim
pieces to protect from marring the surface.
|
| •
|
Take care not to bend or scratch the trim and panels.
|
|
|
1. |
Remove the front seat back cover.
(Refer to Front Seat - "Front Seat Back Cover")
|
|
2. |
Remove the front seat cushion cover.
(Refer to Front Seat - "Front Seat Cushion Cover")
|
|
3. |
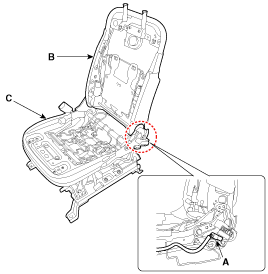
Disconnect the connector (A).
|
|
4. |
After loosening the mounting bolts, then disconnect the front
seat back frame assembly (B) and front seat cushion frame assembly (C).
Tightening torque :
44.1 ~ 53.9 N.m (4.5 ~ 5.5 kgf.m, 32.5 ~ 39.8 lb-ft)
|
|
|
5. |
Install in the reverse order of removal.
|
• |
Remove the side air bag for replacing side air
bag installation seat.
(Refer to Restraint - "Side Airbag (SAB) Module")
|
|
• |
Before service, be fully aware of precautions
and service procedure relevant to air bag.
(Refer to Restraint - "Side Airbag (SAB) Module")
|
|
|
1. Front seat back frame assembly
2. Front seat cushion frame assembly
...
See also:
SRS Care
The SRS is virtually maintenancefree and so there are no parts you can safely
service by yourself. If the SRS air bag warning light does not illuminate, or continuously
remains on, have your vehic ...
Necessary inspections
Fluid levels, such as engine oil, engine coolant, brake fluid, and washer fluid
should be checked on a regular basis, with the exact interval depending on the fluid.
Further details are provided i ...
Shift Cable. Removal
1.
Remove the floor console assembly.
(Refer to Body - "Floor Console")
2.
Remove the rear heating joint duct (A).
...
 Kia Soul: Front Seat Frame Assembly Replacement


 Front Seat Frame Assembly Component Location
 Front Seat Belt