 Kia Soul: Front seat adjustment - power (if equipped)
The front seat can be adjusted by using the control switches located on the outside of the seat cushion.
Before driving, adjust the seat to the proper position so you can easily control the steering wheel, pedals and switches on the instrument panel.
WARNING
The power seat is operable with the ignition OFF.
Therefore, children should never be left unattended in the vehicle.
CAUTION
- The power seat is driven by an electric motor. Stop operating once the adjustment is completed. Excessive operation may damage the electrical equipment.
- When in operation, the power seat consumes a large amount of electrical power. To prevent unnecessary charging system drain, don’t adjust the power seat longer than necessary while the engine is not running.
- Do not operate two or more power seat control switches at the same time. Doing so may result in power seat motor or electrical component malfunction.
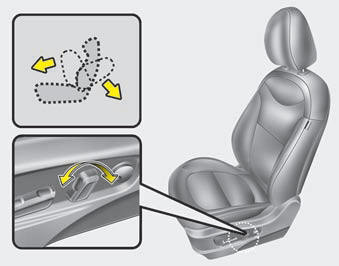
Forward and backward

Push the control switch forward or backward to move the seat to the desired position. Release the switch once the seat reaches the desired position.
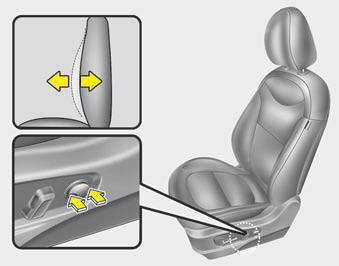
Seatback angle
Push the control switch forward or backward to move the seatback to the desired angle. Release the switch once the seat reaches the desired position.
Seat height (for driver’s seat)
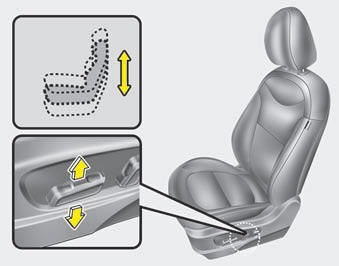
Pull the front portion of the control switch up to raise or press down to lower the front part of the seat cushion.
Pull the rear portion of the control switch up to raise or press down to lower the rear part of the seat cushion. Release the switch once the seat reaches the desired position.
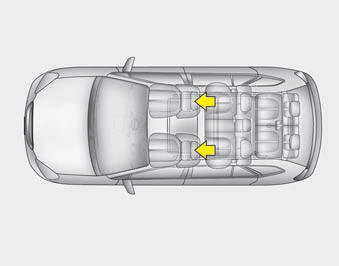
Lumbar support (for driver’s seat)
The lumbar support can be adjusted by pressing the button.
Headrest (for front seat)
The driver's and front passenger's seats are equipped with a headrest for the occupant's safety and comfort.
The headrest not only provides comfort for the driver and front passenger, but also helps protect the head and neck in the event of a rear collision.
WARNING
- For maximum effectiveness in case of an accident, the headrest should be adjusted so the middle of the headrest is at the same height of the center of gravity of an occupant's head. Generally, the center of gravity of most people's head is similar with the height of the top of their eyes. Also, adjust the headrest as close to your head as possible. For this reason, the use of a cushion that holds the body away from the seatback is not recommended.
- Do not operate the vehicle with the headrests removed. Severe injury to the occupants may occur in the event of an accident. Headrests may provide protection against neck injuries when properly adjusted.
- Do not adjust the headrest position of the driver’s seat while the vehicle is in motion.
Forward and rearward adjustment
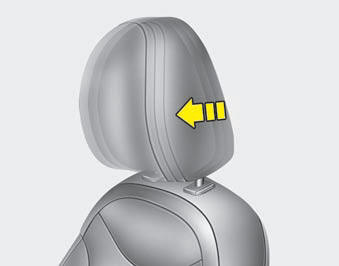
The headrest may be adjusted forward to 4 different positions by pulling the headrest forward to the desired detent. To adjust the headrest to it’s furthest rearward position, pull it fully forward to the farthest position and release it. Adjust the headrest so that it properly supports the head and neck.
Adjusting the height up and down
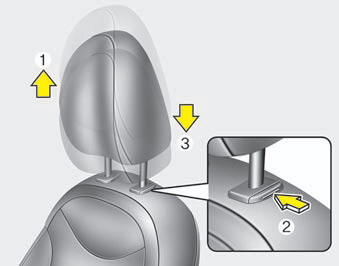
To raise the headrest, pull it up to the desired position (1). To lower the headrest, push and hold the release button (2) on the headrest support and lower the headrest to the desired position (3).
Removal and installation
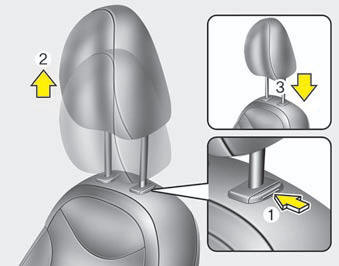
To remove the headrest, raise it as far as it can go then press the release button (1) while pulling the headrest up (2).
To reinstall the headrest, put the headrest poles (3) into the holes while pressing the release button (1). Then adjust it to the appropriate height.
Make sure the headrest locks in position after adjusting it to properly protect the occupants.
 Front seat adjustment - manual
Forward and backward
To move the seat forward or backward:
1. Pull the seat slide adjustment lever up and hold it.
2. Slide the seat to the position you desire.
3. Release the lever and make s ...
 Seatback pocket
The seatback pocket is provided on the back of the front passenger’s seatbacks.
WARNING - Seatback pockets
Do not put heavy or sharp objects in the seatback pockets. In an accident
they coul ...
See also:
Camshaft Position Sensor (CMPS). Description and Operation
Description
Camshaft Position Sensor (CMPS) is a hall sensor and detects the camshaft
position by using a hall element.
It is related with Crankshaft Position Sensor (CKPS) and detects the ...
Rear Seat Belt Retractor Component Location
1. Rear seat belt retractor
...