| •
|
Put on gloves to protect your hands.
|
|
| •
|
When prying with a flat-tip screwdriver, wrap it with
protective tape, and apply protective tape around the related
parts, to prevent damage.
|
| •
|
Use a plastic panel removal tool to remove interior trim
pieces to protect from marring the surface.
|
| •
|
Take care not to bend or scratch the trim and panels.
|
|
|
1. |
Remove the front pillar trim.
|
(1) |
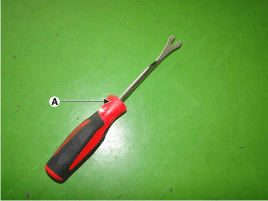
To remove the front pillar trim, the below tool (A) must
be used.
|
|
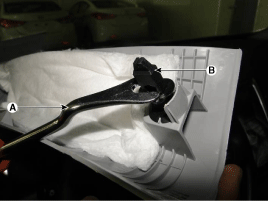
(2) |
Slightly spread open the front pillar trim and then place
the tool (A) on the mounting clip (B) like the picture below.
After placing the tool (A) on the mounting clip (B) push
it to the front.
|
• |
Once the front pillar trim has been removed,
replace the clips to new ones.
|
|
|
|
(3) |
Remove the front pillar trim (A).
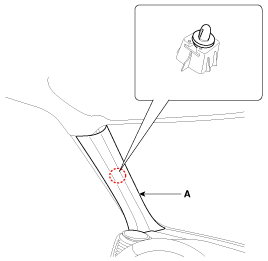
| A. |
Front Pillar Trim Mounting Method
|
|
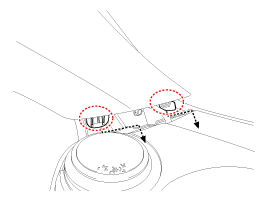
• |
Remove the mounting clip (A) by turning
it clockwise.
|
|

|
|
|
2. |
Install in the reverse order of removal.
|
• |
Replace any damaged clips.
|
|
|
1. Center pillar lower trim
2. Center pillar upper trim
...
See also:
Front Lower Arm Inspection
1.
Check the bushing for wear and deterioration.
2.
Check the front stabilizer bar for deformation.
3.
Check th ...
ESC OFF Switch. Description
1.
The ESC OFF switch is for the user to turn off the ESC system.
2.
The ESC OFF lamp is on when ESC OFF switch is engaged.
...
Telemetics Unit (TMU) Installation
1.
Install the MTS unit after connecting the cable and connector.
2.
Install the glove box housing.
...
 Kia Soul: Front Pillar Trim Replacement


 Front Pillar Trim Component Location
 Center Pillar Trim Component Location