| •
|
Put on gloves to protect your hands.
|
|
| •
|
When prying with a flat-tip screwdriver, wrap it with
protective tape, and apply protective tape around the related
parts, to prevent damage.
|
| •
|
Use a plastic panel removal tool to remove interior trim
pieces to protect from marring the surface.
|
| •
|
Take care not to bend or scratch the trim and panels.
|
|
|
1. |
Remove the front door scuff trim.
(Refer to Interior Trim - "Door Scuff Trim")
|
|
2. |
Remove the hood latch release handle.
(Refer to Hood - "Hood Latch Release Handle")
|
|
3. |
Slighty remove the front door body side weatherstrip.
|
|
4. |
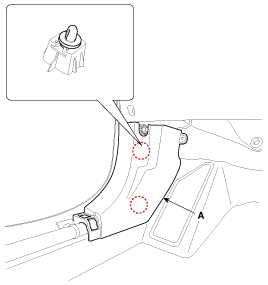
Using a screwdriver or remover, remove the cowl side trim (A).

|
|
5. |
Install in the reverse order of removal.
|
• |
Replace any damaged clips.
|
|
|
See also:
How to use this manual
We want to help you get the greatest possible driving pleasure from your vehicle.
Your Owner’s Manual can assist you in many ways.We strongly recommend that you read
the entire manual. In order ...
Smart Key Unit Removal
Smart Key Unit
1.
Disconnect the negative (-) battery terminal.
2.
Remove the main crash pad assembly.
(Refer to ...
Before starting
Close and lock all doors.
Position the seat so that all controls are easily reached.
Adjust the inside and outside rearview mirrors.
Be sure that all lights work.
Check all gauges.
Check ...
 Kia Soul: Cowl Side Trim Replacement
 Cowl Side Trim Component Location
 Front Pillar Trim Component Location


