 Kia Soul: Changing tires

1.Park on a level surface and apply the parking brake firmly.
2.Place the transaxle shift lever in R (Reverse) with manual transaxle or P (Park) with automatic transaxle.
3.Activate the hazard warning flashers.
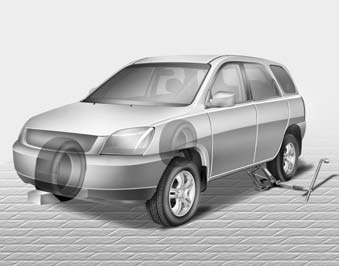
4.Remove the wheel lug nut wrench, jack, jack handle, and spare tire from the vehicle.
5.Block both the front and rear of the wheel that is diagonally opposite from the jack position.
WARNING - Changing a tire
- To prevent vehicle movement while changing a tire, always set the parking brake fully, and always block the wheel diagonally opposite the wheel being changed.
- We recommend that the wheels of the vehicle be blocked, and that no person remain in a vehicle that is being jacked.
6.Loosen the wheel lug nuts counterclockwise one turn each, but do not remove any nut until the tire has been raised off the ground.
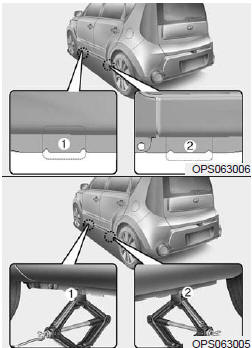
7.Place the jack at the front (1) or rear (2) jacking position closest to the tire you are changing. Place the jack at the designated locations under the frame.
WARNING - Jack location
To reduce the possibility of injury, be sure to use only the jack provided with the vehicle and in the correct jack position; never use any other part of the vehicle for jack support.
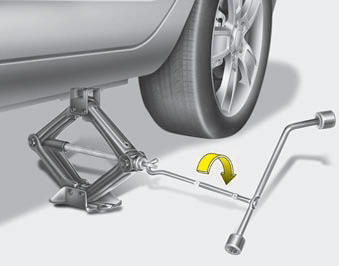
8.Insert the jack handle into the jack and turn it clockwise, raising the vehicle until the tire just clears the ground. This measurement is approximately 1 in. (30 mm).
Before removing the wheel lug nuts, make sure the vehicle is stable and that there is no chance for movement or slippage.
9.Loosen the wheel nuts and remove them with your fingers. Slide the wheel off the studs and lay it flat so it cannot roll away.To put the wheel on the hub, pick up the spare tire, line up the holes with the studs and slide the wheel onto them. If this is difficult, tip the wheel slightly and get the top hole in the wheel lined up with the top stud. Then jiggle the wheel back and forth until the wheel can slide over the other studs.
WARNING
Wheels may have sharp edges. Handle them carefully to avoid possible severe injury. Before putting the wheel into place, be sure that there is nothing on the hub or wheel (such as mud, tar, gravel, etc.) that prevents the wheel from fitting solidly against the hub. If there is, remove it. If the contact of the mounting surface between the wheel and hub is not good, the wheel nuts could come loose and cause the loss of a wheel. Loss of a wheel may result in loss of control of the vehicle. This may cause serious injury or death.
10. To install the wheel, hold it on the studs, put the wheel nuts on the studs and tighten them finger tight. Jiggle the tire to be sure it is completely seated, then tighten the nuts as much as possible with your fingers again.
11. Insert the wrench into the jack and lower the vehicle to the ground by turning the wheel nut wrench counterclockwise.
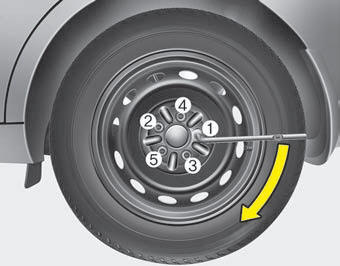
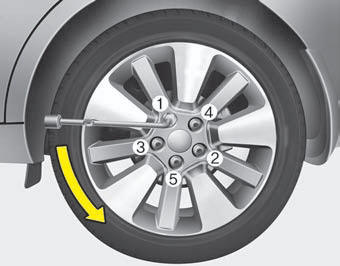
Then position the wrench as shown in the drawing and tighten the wheel nuts. Be sure the socket is seated completely over the nut. Do not stand on the wrench handle or use an extension pipe over the wrench handle.
Go around the wheel tightening every nut following the numerical sequence shown in the image until they are all tight. Then double-check each nut for tightness. After changing wheels, have an authorized Kia dealer tighten the wheel nuts to their proper torque as soon as possible.
Wheel nut tightening torque:
65~79 lb·ft (9~11 kg·m)
If you have a tire gauge, remove the valve cap and check the air pressure.
If the pressure is lower than recommended, drive slowly to the nearest service station and inflate to the correct pressure. If it is too high, adjust it until it is correct. Always reinstall the valve cap after checking or adjusting the tire pressure. If the cap is not replaced, dust and dirt may get into the tire valve and air may leak from the tire. If you lose a valve cap, buy another and install it as soon as possible.
After you have changed the wheels, always secure the flat tire in its place and return the jack and tools to their proper storage locations.
CAUTION
Your vehicle has metric threads on the wheel studs and nuts. Make certain during wheel removal that the same nuts that were removed are reinstalled - or, if replaced, that nuts with metric threads and the same chamfer configuration are used. Installation of a non-metric thread nut on a metric stud or vice-versa will not secure the wheel to the hub properly and will damage the stud so that it must be replaced. Note that most lug nuts do not have metric threads. Be sure to use extreme care in checking for thread style before installing aftermarket lug nuts or wheels. If in doubt, consult an authorized Kia dealer.
WARNING - Wheel studs
If the studs are damaged, they may lose their ability to retain the wheel. This could lead to the loss of the wheel and a collision resulting in serious injuries.
To prevent the jack, jack handle, wheel lug nut wrench and spare tire from rattling while the vehicle is in motion, store them properly.
WARNING - Inadequate spare tire pressure
Check the inflation pressures as soon as possible after installing the spare tire. Adjust it to the specified pressure, if necessary.
Important - use of compact spare tire (if equipped)
Your vehicle is equipped with a compact spare tire. This compact spare tire takes up less space than a regular- size tire. This tire is smaller than a conventional tire and is designed for temporary use only.
CAUTION
- You should drive carefully when the compact spare is in use. The compact spare should be replaced by the proper conventional tire and rim at the first opportunity.
- The operation of this vehicle is not recommended with more than one compact spare tire in use at the same time.
WARNING
The compact spare tire is for emergency use only. Do not operate your vehicle on this compact spare at speeds over 50 mph (80 km/h). The original tire should be repaired or replaced as soon as possible to avoid failure of the spare possibly leading to personal injury or death.
The compact spare should be inflated to 60 psi (420 kPa).
✽ NOTICE
Check the inflation pressure after installing the spare tire. Adjust it to the specified pressure, as necessary.
When using a compact spare tire, observe the following precautions:
- Under no circumstances should you exceed 50 mph (80 km/h); a higher speed could damage the tire.
- Ensure that you drive slowly enough for the road conditions to avoid all hazards. Any road hazard, such as a pothole or debris, could seriously damage the compact spare.
- Any continuous road use of this tire could result in tire failure, loss of vehicle control, and possible personal injury.
- Do not exceed the vehicle’s maximum load rating or the load-carrying capacity shown on the sidewall of the compact spare tire.
- Avoid driving over obstacles. The compact spare tire diameter is smaller than the diameter of a conventional tire and reduces the ground clearance approximately 1 inch (25 mm), which could result in damage to the vehicle.
- Do not take this vehicle through an automatic vehicle wash while the compact spare tire is installed.
- Do not use tire chains on the compact spare tire. Because of the smaller size, a tire chain will not fit properly. This could damage the vehicle and result in loss of the chain.
- Do not use the compact spare tire on any other vehicle because this tire has been designed especially for your vehicle.
- The compact spare tire’s tread life is shorter than a regular tire. Inspect your compact spare tire regularly and replace worn compact spare tires with the same size and design, mounted on the same wheel.
- The compact spare tire should not be used on any other wheels, nor should standard tires, snow tires, wheel covers or trim rings be used with the compact spare wheel. If such use is attempted, damage to these items or other vehicle components may occur.
- Do not use more than one compact spare tire at a time.
- Do not tow a trailer while the compact spare tire is installed.
 Removing and storing the spare tire (if equipped)
Turn the tire hold-down wing bolt counterclockwise.
Store the tire in the reverse order of removal.
To prevent the spare tire and tools from “rattling” while the vehicle is in motion,
stor ...
 If you have a flat tire (tire mobility kit, if equipped)
For safe operation, carefully read and follow the instructions in this manual before use.
(1) Compressor
(2) Sealant bottle
The Tire Mobility Kit is a temporary fix to the tire and the tire shou ...
See also:
Exterior feature
Roof rack
If the vehicle has a roof rack, you can load cargo on top of your vehicle.
The following specification is the maximum weight that can be loaded onto the
roof rack. Distribute the load ...
Changing tires
1. Park on a level surface and apply the parking brake firmly.
2. Place the transaxle shift lever in R (Reverse) with manual transaxle or P (Park)
with automatic transaxle.
3. Activate the hazar ...
Driving in flooded areas
Avoid driving through flooded areas unless you are sure the water is no higher
than the bottom of the wheel hub. Drive through any water slowly. Allow adequate
stopping distance because brake perf ...