 Kia Soul: Removal
|
|
| 1. |
Remove both sides of the front pillar trim.
(Refer to Interior Trim - "Front Pillar Trim")
|
| 2. |
Remove both sides of the A pillar garnish.
(Refer to Body Side Moulding- "A Pillar Garnish")
|
| 3. |
Remove the cowl top cover.
(Refer to "Cowl Top Cover")
|
| 4. |
Remove the inside rear view mirror assembly.
(Refer to Mirror - "Inside Rear View Mirror")
|
| 5. |
Remove the LDWS unit.
(Refer to Body Electrical System - "Lane Departure Warning System
(LDWS) Unit")
|
| 6. |
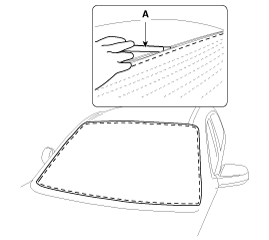
Cut out the adhesive using a cutter (A).
|
| 7. |
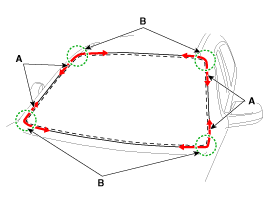
Cut off the sealant on the edge (B) while pulling the piano wire
(A) left and right.
|
| 8. |
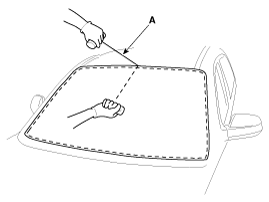
If a piano wire is visible inside the chassis, pull the piano
wire (A) line inside.
|
| 9. |
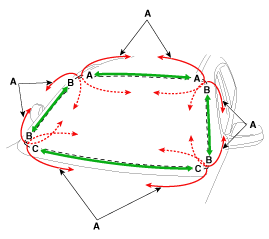
Cut off the sealant on (A-A), (B-B), (C-C), while pulling a piano
wire (A) left and right.
|
| 10. |
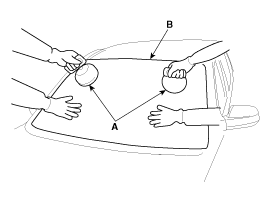
Remove the windshield glass (B) carefully using the glass holder
(A).
|
 Components
1. Windshield glass
2. Windshield glass moulding
...
 Installtion
1.
With a knife, scrape the old adhesive smooth to a thickness of
about 2mm (0.08 in.) on the bonding surface around the entire windshield
opening flange:
...
See also:
Drive shafts and boots
Check the drive shafts, boots and clamps for cracks, deterioration, or damage.
Replace any damaged parts and, if necessary, repack the grease. ...
Climate control air filter (if equipped)
The climate control air filter installed behind the glove box filters the dust
or other pollutants that come into the vehicle from the outside through the heating
and air conditioning system. ...
Field Effect Transistor (FATC) Inspection
1.
Turn the ignition switch ON.
2.
Manually operate the control switch and measure the voltage of
the blower motor.
3. ...


