 Kia Soul: Parking Brake
Inspect the parking brake system including the parking brake lever (or
pedal) and cables.
Adjustment
Parking Brake Lever Stroke Adjustment
| 1. |
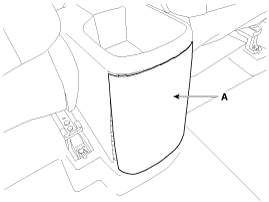
Remove the rear console cover (A).
|
| 2. |
Apply the brake pedal 20 times with the force of 10kgf after bleeding.
Then, for the cable to settle in, apply the parking brake full stroke
more than 3 times.
|
| 3. |
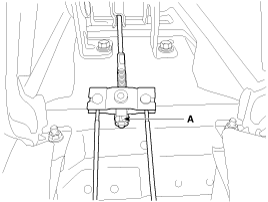
Install the parking brake cable adjuster, and then adjust the
parking brake lever stroke by turning adjusting nut (A).
|
| 4. |
Release the parking brake lever fully, and check that parking
brakes do not drag when the rear wheels are turned. Readjust if necessary.
|
| 5. |
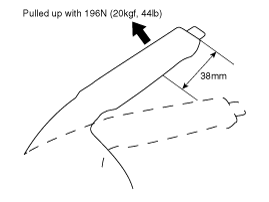
Make sure that the parking brakes are fully applied when the parking
brake lever is pulled up fully
|
| 6. |
Install the rear console cover.
|
Rear Brake Caliper Gap
Re-setting of the parking brake is necessary after overhauling
the caliper body, or if the brake calipers, housing, parking brake cable
or brake discs have been changed.
|
| 1. |
Remove the floor console to reach the adjusting nut
|
| 2. |
Loosen the parking brake cable until both operating levers rest
in fully off position.
|
| 3. |
Bring the brake pads in their operating position by pressing the
brake pedal down several times until there is resistance.
|
| 4. |
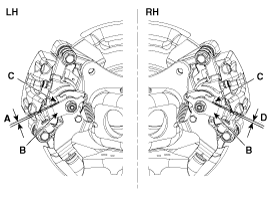
Tension the parking brake cable by tightening the adjusting nut,
until the operating levers on both calipers lift from the stop, up to
a distance of (A) and (D) between operating lever (B) and stopper (C).
|
| 5. |
Parking brake lever in the car must be in fully loosened position.
|
| 6. |
If the handbrake cables where changed, actuate the parking brake
a few times with maximum force to stretch the parking brake cables,
and then control adjusting as above.
|
| 7. |
Check the wheels of their free operation.
|
| 8. |
Install the floor console.
|
| 9. |
Test drive.
|
 Drive shafts and boots Inspection
1.
Check the drive shaft boots for loose clamps, cracks, grease leaks,
kinks or damage.
...
 Steering gear rack, linkage and boots
Inspection
1.
Check the steering wheel free road.
(1)
Turn the steering wheel so that the front wheels can face
straight ahead.
...
See also:
Transaxle Control Module (TCM). Description
Transaxle Control Module (TCM) is the automatic transaxle's brain. The
module receives and processes signals from various sensors and implements a
wide range of transaxle controls to ensu ...
Shift Lever Removal
1.
Rotating counter-clockwise shift lever knob (A).
2.
Remove the floor console assembly.
(Refer to Body - "Floor Console& ...
General Information
1.
Check & Change intervals
Check & Replenishment
Change
Capacity
Oil specification
...


