 Kia Soul: Height adjustment

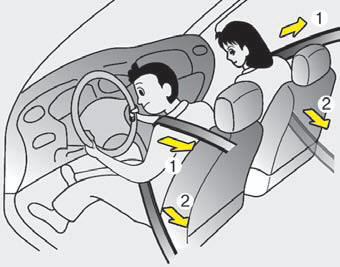
You can adjust the height of the shoulder belt anchor to one of the 3 positions for maximum comfort and safety.
The height of the adjusting seat belt should not be too close to your neck. The shoulder portion should be adjusted so that it lies across your chest and midway over your shoulder near the door and not your neck.
To adjust the height of the seat belt anchor, lower or raise the height adjuster into an appropriate position.
To raise the height adjuster, pull it up (1). To lower it, push it down (3) while pressing the height adjuster button (2).
Release the button to lock the anchor into position. Try sliding the height adjuster to make sure that it has locked into position.
WARNING
- Verify that the shoulder belt anchor is locked into position at the appropriate height. Never position the shoulder belt across your neck or face. Improperly positioned seat belts can cause serious injuries in an accident.
- Failure to replace seat belts after an accident could leave you with damaged seat belts that will not provide protection in the event of another collision leading to personal injury or death. Replace your seat belts after being in an accident as soon as possible.
WARNING
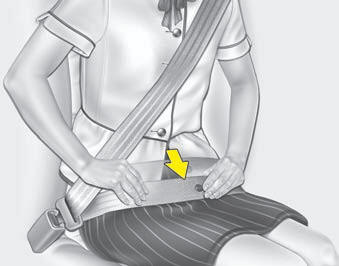
You should place the lap belt portion as low as possible and snugly across your hips, not on your waist. If the lap belt is located too high on your waist, it may increase the chance of injury in the event of a collision. Both arms should not be under or over the belt. Rather, one should be over and the other under, as shown in the illustration.
Never wear the seat belt under the arm that is near the door.
Seat belts - Front passenger and rear seat 3-point system with combination locking retractor
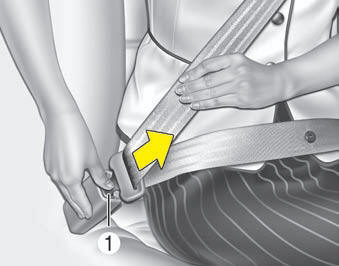
To fasten your seat belt:
Combination retractor type seat belts are installed in the rear seat positions to help accommodate the installation of child restraint systems. Although a combination retractor is also installed in the front passenger seat position, it is strongly recommended that children always be seated in the rear seat. NEVER place any infant restraint system in the front seat of the vehicle.
This type of seat belt combines the features of both an emergency locking retractor seat belt and an automatic locking retractor seat belt. To fasten your seat belt, pull it out of the retractor and insert the metal tab into the buckle. There will be an audible "click" when the tab locks into the buckle. When not securing a child restraint, the seat belt operates in the same way as the driver's seat belt (Emergency Locking Retractor Type).
It automatically adjusts to the proper length only after the lap belt portion of the seat belt is adjusted manually so that it fits snugly around your hips.
When the seat belt is fully extended from the retractor to allow the installation of a child restraint system, the seat belt operation changes to allow the belt to retract, but not to extend (Automatic Locking Retractor Type).
Refer to “Using a child restraint system” in this section.
✽ NOTICE
Although the combination retractor provides the same level of protection for seated passengers in either emergency or automatic locking modes, have the seated passengers use the emergency locking feature for improved convenience. The automatic locking function is intended to facilitate child restraint installation. To convert from the automatic locking feature to the emergency locking operation mode, allow the unbuckled seat belt to fully retract.
CAUTION
Do NOT fold down the left portion of the rear seat back when the rear center seat belt is buckled. ALWAYS UNBUCKLE the rear center seat belt before folding down the left portion of the rear seat back. If the rear center seat belt is buckled when the left portion of the rear seat back is folded down, distortion and damage to the top portion of the seat back and seat belt garnish may result, causing the seat back to lock into the folded down position.
To release the seat belt:
The seat belt is released by pressing the release button (1) on the locking buckle. When it is released, the belt should automatically draw back into the retractor.
If this does not happen, check the belt to be sure it is not twisted, then try again.
Stowing the rear seat belt
The rear seat belt buckles can be stowed in the pocket between the rear seatback and cushion when not in use.
Routing the seat belt webbing through the rear seat belt guides will help keep the belts from being trapped behind or under the seats.
After inserting the seat belt, tighten the belt webbing by pulling it up.
CAUTION
Remove the seat belt from the guides before using. If you pull on the seat belt when it is stored in the guides, it may damage the guides and/or belt webbing.
3 Point rear center belt
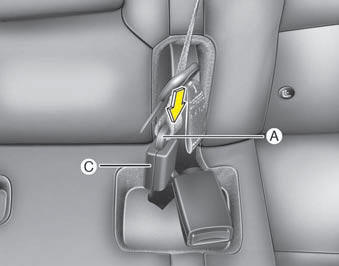
To fasten the rear center belt
1.Insert the mini tongue (A) into the open end of the anchor connector (C) until an audible “click" is heard, indicating the latch is locked. Make sure the belt is not twisted.
WARNING - Rear center seat belt
Do not separate mini tongue and mini buckle even if there is not an occupant.
If it is separated, It may hit the rear seat occupants in a collision or sudden stops.
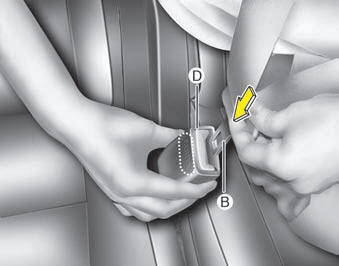
2.Pull the tongue plate (B) and insert the tongue plate (B) into the open end of the buckle (D) until an audible “click” is heard, indicating the latch is locked. Make sure the belt is not twisted.
CAUTION
When using the rear center seat belt, the buckle with the “CENTER” mark must be used.
There will be an audible “click” when the tab locks in the buckle. The seat belt automatically adjusts to the proper length only after the lap belt is adjusted manually so that it fits snugly around your hips, if you lean forward in a slow, easy motion, the belt will extend and let you move around.
If there is a sudden stop or impact, the belt will lock into position. It will also lock if you try to lean forward too quickly.
WARNING
When using the rear seat center belt, you must lock all tongue plates and buckles. If any tongue plate or buckle is not locked, it will increase the chance of injury in the event of collision.
To unfasten the rear center belt
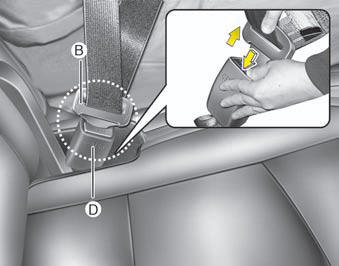
Press the release button on the buckle (D) and remove the tongue plate (B) from the buckle (D).
When you fold the rear seatback

To retract the rear center seatbelt, insert the tongue plate or similar small rigid device into the web release hole (C). Pull up on the seat belt web (A) and allow the webbing to retract automatically.
Pre-tensioner seat belt
Your vehicle is equipped with driver's and front passenger's pre-tensioner seat belts (retractor pretensioner and EFD (Emergency Fastening Device)).
The pre-tensioner seat belts may be activated, when a frontal collision is severe enough, together with the air bags.
When the vehicle stops suddenly, or if the occupant tries to lean forward too quickly, the seat belt retractor may lock into position. In certain frontal collisions, the pre-tensioner will activate and pull the seat belt into tighter contact against the occupant's body.
(1) Retractor Pretensioner
The purpose of the retractor pretensioner is to make sure that the shoulder belts fit in tightly against the occupant's upper body in certain frontal collisions.
(2) EFD (Emergency Fastening Device)
The purpose of the EFD is to make sure that the pelvis belts fit in tightly against the occupant's lower body in certain frontal collisions.
If the system senses excessive tension on the driver or passenger's seat belt when the pre-tensioner system activates, the load limiter inside the retractor pre-tensioner will release some of the pressure on the affected seat belt.
WARNING
- Do not put anything near the buckle. Placing objects near the buckle may increase the risk of personal injury in the event of a collision.
- For your safety, be sure that the belt webbing is not loose or twisted and always sit properly on your seat.

The seat belt pre-tensioner system consists mainly of the following components.
Their locations are shown in the illustration:
1. SRS air bag warning light
2. Retractor pre-tensioner assembly
3. SRS control module
4. Emergency fastening device (EFD)
WARNING
To obtain maximum benefit from a pre-tensioner seat belt:
1. The seat belt must be worn correctly and adjusted to the proper position.
Please read and follow all of the important information and precautions about your
vehicle’s occupant safety features – including seat belts and air bags – that are
provided in this manual.
2. Be sure you and your passengers always wear seat belts properly.
NOTICE
- Both the driver's and front passenger's seat belt pre-tensioner system may be activated not only in certain frontal collision but also in certain side collision or rollover, if the vehicle is equipped with a side or curtain air bag.
- When the pre-tensioner seat belts are activated, a loud noise may be heard and fine dust, which may appear to be smoke, may be visible in the passenger compartment. These are normal operating conditions and are not hazardous.
- Although it is harmless, the fine dust may cause skin irritation and should not be breathed for prolonged periods. Wash all exposed skin areas thoroughly after an accident in which the pre-tensioner seat belts were activated.
- Because the sensor that activates the SRS air bag is connected with the
pre-tensioner seat belt, the SRS air bag warning light
 on
the instrument panel will illuminate for approximately 6 seconds after the ignition
switch has been turned to the ON position, and then it should turn off.
on
the instrument panel will illuminate for approximately 6 seconds after the ignition
switch has been turned to the ON position, and then it should turn off.
CAUTION
If the pre-tensioner seat belt system are not working properly, this warning light will illuminate even if there is no malfunction of the SRS air bag. If the SRS air bag warning light does not illuminate when the ignition switch is turned ON, or if it remains illuminated after illuminating for approximately 6 seconds, or if it illuminates while the vehicle is being driven, have an authorized Kia dealer inspect the pre-tensioner seat belt and SRS air bag system as soon as possible.
WARNING
- Pre-tensioners are designed to operate only one time. After activation, pre-tensioner seat belts must be replaced. All seat belts, of any type, should always be replaced after they have been worn during a collision.
- The pre-tensioner seat belt assembly mechanisms become hot during activation. Do not touch the pre-tensioner seat belt assemblies for several minutes after they have been activated.
- Do not attempt to inspect or replace the pre-tensioner seat belts yourself. This must be done by an authorized Kia dealer.
- Do not strike the pre-tensioner seat belt assemblies.
- Do not attempt to service or repair the pre-tensioner seat belt system in any manner.
- Improper handling of the pretensioner seat belt assemblies, and failure to heed the warnings not to strike, modify, inspect, replace, service or repair the pre-tensioner seat belt assemblies may lead to improper operation or inadvertent activation and serious injury.
- Always wear the seat belts when driving or riding in a motor vehicle.
- If the vehicle or pre-tensioner seat belt must be discarded, contact an authorized Kia dealer.
 Seat belt restraint system
WARNING
For maximum restraint system protection, the seat belts must always be
used whenever the vehicle is moving.
Seat belts are most effective when seatbacks are in the upright position.
...
 Seat belt precautions
WARNING
All occupants of the vehicle must wear their seat belts at all times. Seat
belts and child restraints reduce the risk of serious or fatal injuries for all
occupants in the event of a coll ...
See also:
Height Adjust Replacement
1.
Remove the front seat belt upper anchor.
(Refer to Front Seat Belt - "Front Seat Belt Pretensioner")
2.
After loosening th ...
Windshield Wiper-Washer Switch
Inspection
Check for continuity between the terminals while operating the wiper
and washer switch. If it is not normal condition, replace wiper and wiper
switch.
Wiper Switch
...
Before entering vehicle
Be sure that all windows, outside mirror(s), and outside lights are clean.
Check the condition of the tires.
Check under the vehicle for any sign of leaks.
Be sure there are no obstacles behi ...