 Kia Soul: Front Disc Brake. Removal
Brake caliper assembly
| 1. |
Remove the front wheel & tire.
|
| 2. |
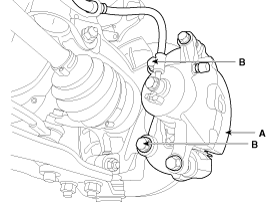
Loosen the hose eyebolt (C) and guide rod bolts (B) and then remove
the front caliper body (A).
|
| 3. |
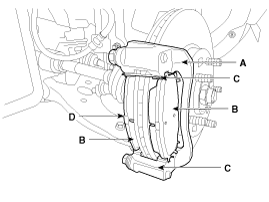
Remove the pad shim (D), pad retainers (C) and brake pads (B)
in the caliper carrier (A).
|
| 4. |
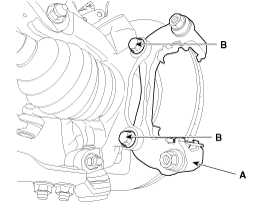
Loosen the caliper mounting bolts (B) and then remove the caliper
carrier (A).
|
Front Wheel Brake disc
| 1. |
Remove the front wheel & tire.
|
| 2. |
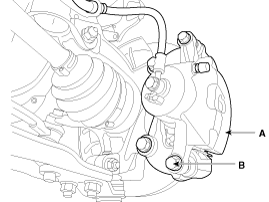
Loosen the guide rod bolt (B) and pivot the caliper body (A) up
out of the way.
|
| 3. |
Remove the pad shim (D), pad retainers (C) and brake pads (B)
in the caliper carrier (A).
|
| 4. |
Loosen the caliper mounting bolts (B) and then remove the caliper
carrier (A).
|
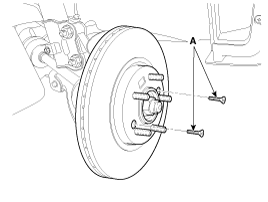
| 5. |
Remove the front brake disc by loosening the screws (A).
|
 Front Disc Brake. Components
1. Guide rod bolt
2. Bleed screw
3. Caliper carrier
4. Caliper body
5. Inner pad shim
6. Brake pad
7. Pad retainer
...
 Front Disc Brake. Replacement
Front brake pads
1.
Remove the front wheel & tire.
2.
Loosen the guide rod bolt (B) and pivot the caliper body (A) up
out of the wa ...
See also:
Battery recharging
WARNING - Risk of electrocution
Never touch the electrical ignition system while the vehicle is running. This
system works with high voltage which can "zap" you.
Your vehicle has a maint ...
Closing the fuel filler lid
1. To install the cap, turn it clockwise until it “clicks”. This indicates that
the cap is securely tightened.
2. Close the fuel filler lid and push it in lightly making sure that it is securel ...
Output Speed Sensor. Installation
1.
Install in the reverse order of removal.
•
...


